Install
Welcome to Caffe2! Get started with deep learning today by following the step by step guide on how to download and install Caffe2.
Select your preferred platform and install type.
| Platform: | MacOS X Ubuntu CentOS Windows iOS Android Raspbian Tegra |
| Install Type: | Pre-Built Binaries Build From Source Docker Images Cloud |
We only support Anaconda packages at the moment. If you do not wish to use Anaconda, then you must build Caffe2 from source.
Anaconda packages
We build Mac packages without CUDA support for both Python 2.7 and Python 3.6. To install Caffe2 with Anaconda, simply activate your desired conda environment and run the following command.
1
conda install pytorch-nightly-cpu -c pytorch
This does NOT include libraries that are necessary to run the tutorials, such as jupyter. See the tutorials page for the list of required packages needed to run the tutorials.
NOTE: This will install Caffe2 and all of its required dependencies into the current conda environment. We strongly suggest that you create a new conda environment and install Caffe2 into that. A conda environment is like a separate python installation and so won’t have problems with your other conda environments. You can learn more about conda environments here.
Prebuilt Caffe2 Python Wheel
This is in beta mode, but you can try
1
pip install torch_nightly -f https://download.pytorch.org/whl/nightly/cpu/torch_nightly.html
To compile Caffe2 to use your GPU, follow these instructions first, then:
First install your dependencies. You will need brew to install Caffe2’s dependencies.
1
2
3
4
5
6
7
8
9
10
11
12
13
14
brew install \
    automake \
    cmake \
    git \
    gflags \
    glog \
    python

pip install --user \
    future \
    numpy \
    protobuf \
    pyyaml \
    six
To run the tutorials you will need to install more packages, see the Tutorial page for full requirements.
Then compile Caffe2 from source:
1
2
3
git clone https://github.com/pytorch/pytorch.git && cd pytorch
git submodule update --init --recursive
python setup.py install
For any problems, see our troubleshooting guide.
Test the Caffe2 Installation
Run this to see if your Caffe2 installation was successful.
1
cd ~ && python -c 'from caffe2.python import core' 2>/dev/null && echo "Success" || echo "Failure"
If this fails, then get a better error message by running Python in your home directory and then running from caffe2.python import core inside Python. Then see the Troubleshooting page for help.
GPU Support
In the instance that you have a NVIDIA supported GPU in your Mac, then you should visit the NVIDIA website for CUDA and cuDNN and install the provided binaries. Also see this Nvidia guide on setting up your GPU correctly. Caffe2 requires CUDA 6.5 or greater.
Once CUDA and CuDNN (and optionally NCCL) are installed, please verify that your CUDA installation is working as expected, and then continue with your preferred Caffe2 installation path.
After Caffe2 is installed, you should NOT see the following error when you try to import caffe2.python.core in Python
1
2
WARNING:root:This caffe2 python run does not have GPU support. Will run in CPU only mode.
WARNING:root:Debug message: No module named 'caffe2.python.caffe2_pybind11_state_gpu'
If you see this error then your GPU installation did not work correctly.
We only support Anaconda packages at the moment. If you do not wish to use Anaconda, then you must build Caffe2 from source.
Anaconda packages
We build Linux packages without CUDA support, with CUDA 9.0 support, and with CUDA 8.0 support, for both Python 2.7 and Python 3.6. These packages are built on Ubuntu 16.04, but they will probably work on Ubuntu14.04 as well (if they do not, please tell us by creating an issue on our Github page). To install Caffe2 with Anaconda, simply activate your desired conda environment and then run one of the following commands:
If you do not have a GPU:
1
conda install pytorch-nightly-cpu -c pytorch
For GPU support you will need CUDA, CuDNN, and NCCL. These must be installed from Nvidia’s website.
For Caffe2 with CUDA 9 and CuDNN 7 support:
1
conda install pytorch-nightly -c pytorch
For Caffe2 with CUDA 8 and CuDNN 7 support:
1
conda install pytorch-nightly cuda80 -c pytorch
This does NOT include libraries that are necessary to run the tutorials, such as jupyter. See the tutorials page for the list of required packages needed to run the tutorials.
NOTE: This will install Caffe2 and all of its required dependencies into the current conda environment. We strongly suggest that you create a new conda environment and install Caffe2 into that. A conda environment is like a separate python installation and so won’t have problems with your other conda environments. You can learn more about conda environments here.
You can easily try out Caffe2 by using the Cloud services. Caffe2 is available as AWS (Amazon Web Services) Deep Learning AMI and Microsoft Azure Virtual Machine offerings. You can run run Caffe2 in the Cloud at any scale.
We test the latest code on
- Ubuntu 14.04
- Ubuntu 16.04
Install Dependencies
1
2
3
4
5
6
7
8
9
10
11
12
13
14
15
16
17
18
19
20
21
22
23
24
sudo apt-get update
sudo apt-get install -y --no-install-recommends \
      build-essential \
      git \
      libgoogle-glog-dev \
      libgtest-dev \
      libiomp-dev \
      libleveldb-dev \
      liblmdb-dev \
      libopencv-dev \
      libopenmpi-dev \
      libsnappy-dev \
      libprotobuf-dev \
      openmpi-bin \
      openmpi-doc \
      protobuf-compiler \
      python-dev \
      python-pip
pip install --user \
      future \
      numpy \
      protobuf \
      typing \
      hypothesis
Note
libgflags2is for Ubuntu 14.04.libgflags-devis for Ubuntu 16.04.
1
2
3
4
5
6
7
8
# for Ubuntu 14.04
sudo apt-get install -y --no-install-recommends \
      libgflags2 \
      cmake3
# for Ubuntu 16.04
sudo apt-get install -y --no-install-recommends \
      libgflags-dev \
      cmake
If you have a GPU, follow these additional steps before continuing.
Clone & Build
1
2
3
git clone https://github.com/pytorch/pytorch.git && cd pytorch
git submodule update --init --recursive
python setup.py install
Test the Caffe2 Installation
Run this to see if your Caffe2 installation was successful.
1
cd ~ && python -c 'from caffe2.python import core' 2>/dev/null && echo "Success" || echo "Failure"
If this fails, then get a better error message by running Python in your home directory and then running from caffe2.python import core inside Python.
If this fails with a message about not finding caffe2.python or not finding libcaffe2.so, please see this info on how Caffe2 installs in Python.
If you installed with GPU support, test that the GPU build was a success with this command (run from the top level pytorch directory). You will get a test output either way, but it will warn you at the top of the output if CPU was used instead of GPU, along with other errors such as missing libraries.
1
python caffe2/python/operator_test/activation_ops_test.py
Install with GPU Support
If you plan to use GPU instead of CPU only, then you should install NVIDIA CUDA 8 and cuDNN v5.1 or v6.0, a GPU-accelerated library of primitives for deep neural networks. NVIDIA’s detailed instructions or if you’re feeling lucky try the quick install set of commands below.
Update your graphics card drivers first! Otherwise you may suffer from a wide range of difficult to diagnose errors.
For Ubuntu 14.04
1
2
3
4
5
sudo apt-get update && sudo apt-get install wget -y --no-install-recommends
wget "http://developer.download.nvidia.com/compute/cuda/repos/ubuntu1404/x86_64/cuda-repo-ubuntu1404_8.0.61-1_amd64.deb"
sudo dpkg -i cuda-repo-ubuntu1404_8.0.61-1_amd64.deb
sudo apt-get update
sudo apt-get install cuda
For Ubuntu 16.04
1
2
3
4
5
sudo apt-get update && sudo apt-get install wget -y --no-install-recommends
wget "http://developer.download.nvidia.com/compute/cuda/repos/ubuntu1604/x86_64/cuda-repo-ubuntu1604_8.0.61-1_amd64.deb"
sudo dpkg -i cuda-repo-ubuntu1604_8.0.61-1_amd64.deb
sudo apt-get update
sudo apt-get install cuda
Install cuDNN (all Ubuntu versions)
Version 5.1
1
2
3
4
CUDNN_URL="http://developer.download.nvidia.com/compute/redist/cudnn/v5.1/cudnn-8.0-linux-x64-v5.1.tgz"
wget ${CUDNN_URL}
sudo tar -xzf cudnn-8.0-linux-x64-v5.1.tgz -C /usr/local
rm cudnn-8.0-linux-x64-v5.1.tgz && sudo ldconfig
Version 6.0 Visit NVIDIA’s cuDNN download to register and download the archive. Follow the same instructions above switching out for the updated library.
Be warned that installing CUDA and CuDNN will increase the size of your build by about 4GB, so plan to have at least 12GB for your Ubuntu disk size.
Setting Up Tutorials & Jupyter Server
If you’re running this all on a cloud computer, you probably won’t have a UI or way to view the IPython notebooks by default. Typically, you would launch them locally with ipython notebook and you would see a localhost:8888 webpage pop up with the directory of notebooks running. The following example will show you how to launch the Jupyter server and connect to remotely via an SSH tunnel.
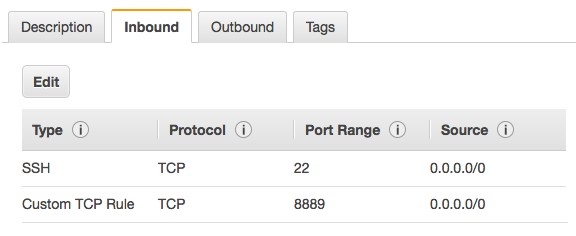
First configure your cloud server to accept port 8889, or whatever you want, but change the port in the following commands. On AWS you accomplish this by adding a rule to your server’s security group allowing a TCP inbound on port 8889. Otherwise you would adjust iptables for this.
Next you launch the Juypter server.
1
jupyter notebook --no-browser --port=8889
Then create the SSH tunnel. This will pass the cloud server’s Jupyter instance to your localhost 8888 port for you to use locally. The example below is templated after how you would connect AWS, where your-public-cert.pem is your own public certificate and [email protected] is your login to your cloud server. You can easily grab this on AWS by going to Instances > Connect and copy the part after ssh and swap that out in the command below.
1
ssh -N -f -L localhost:8888:localhost:8889 -i "your-public-cert.pem" [email protected]
We only support Anaconda packages at the moment. If you do not wish to use Anaconda, then you must build Caffe2 from source.
Anaconda packages
We build Linux packages without CUDA support, with CUDA 9.0 support, and with CUDA 8.0 support, for both Python 2.7 and Python 3.6. These packages are built on Ubuntu 16.04, but they will probably work on CentOS as well (if they do not, please tell us by creating an issue on our Github page). To install Caffe2 with Anaconda, simply activate your desired conda environment and then run one of the following commands:
If you do not have a GPU:
1
conda install pytorch-nightly-cpu -c pytorch
For GPU support you will need CUDA, CuDNN, and NCCL. These must be installed from Nvidia’s website.
For Caffe2 with CUDA 9 and CuDNN 7 support:
1
conda install pytorch-nightly -c pytorch
For Caffe2 with CUDA 8 and CuDNN 7 support:
1
conda install pytorch-nightly cuda80 -c pytorch
This does NOT include libraries that are necessary to run the tutorials, such as jupyter. See the tutorials page for the list of required packages needed to run the tutorials.
NOTE: This will install Caffe2 and all of its required dependencies into the current conda environment. We strongly suggest that you create a new conda environment and install Caffe2 into that. A conda environment is like its own python installation that won’t have library version problems with your other conda environments. You can learn more about conda environments here.
Check the cloud instructions for a general guideline on building from source for CentOS.
The installation instructions for Ubuntu will probably also work in most cases.
AWS Cloud Setup
Amazon Linux AMI with NVIDIA GRID and TESLA GPU Driver
The above AMI had been tested with Caffe2 + GPU support on a G2.2xlarge instance that uses a NVIDIA GRID K520 GPU. This AMI comes with CUDA v7.5, and no cuDNN, so we install that manually. The installation is currently a little tricky, but we hope over time this can be smoothed out a bit. This AMI is great though because it supports the latest and greatest features from NVIDIA.
Installation Guide
Note that this guide will help you install Caffe2 on any CentOS distribution. Amazon uses their own flavor of RHEL and they’ve installed CUDA in different spots than normally expected, so keep that in mind if you have to do some troubleshooting. Some of these steps will not be required on vanilla CentOS because things will go in their normal places.
Get your repos set
Many of the required dependencies don’t show up in Amazon’s enabled repositories. Epel is already provided in this image, but the repo is disabled. You need to enable it by editing the repo config to turn it on. Set enabled=1 in the epel.repo file. This enables you to find cmake3 leveldb-devel lmdb-devel.
1
sudo vim /etc/yum.repos.d/epel.repo

Next you should update yum and install Caffe2’s core dependencies. These differ slightly from Ubuntu due to availability of ready-to-go packages.
1
2
3
4
5
6
7
8
9
10
11
12
13
14
15
sudo yum update
sudo yum install -y \
automake \
cmake3 \
gcc \
gcc-c++ \
git \
kernel-devel \
leveldb-devel \
lmdb-devel \
libtool \
protobuf-devel \
python-devel \
python-pip \
snappy-devel
gflags and glog is not found in yum for this version of Linux, so install from source:
1
2
3
4
5
6
7
8
9
10
git clone https://github.com/gflags/gflags.git && \
cd gflags && \
mkdir build && cd build && \
cmake3 -DBUILD_SHARED_LIBS=ON -DCMAKE_CXX_FLAGS='-fPIC' .. && \
make -j 8 && sudo make install && cd ../.. && \
git clone https://github.com/google/glog && \
cd glog && \
mkdir build && cd build && \
cmake3 -DBUILD_SHARED_LIBS=ON -DCMAKE_CXX_FLAGS='-fPIC' .. && \
make -j 8 && sudo make install && cd ../..
Python Dependencies
Now we need the Python dependencies. Note the troubleshooting info below… the install path with Python can get difficult.
1
2
3
4
5
6
7
pip install --user \
    future \
    numpy \
    protobuf \
    python-nvd3 \
    pyyaml \
    six
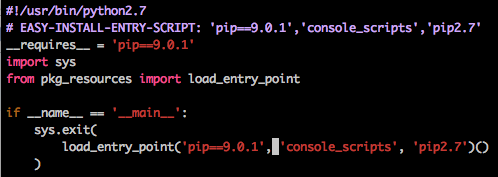
This may fail with error:
pkg_resources.DistributionNotFound: pip==7.1.0
To fix this, upgrade pip, and then update the pip’s config to match the version it upgraded to.
1
2
3
4
5
6
$ sudo easy_install --upgrade pip
Password:
Searching for pip
Reading https://pypi.python.org/simple/pip/
Downloading https://pypi.python.org/packages/11/b6/abcb525026a4be042b486df43905d6893fb04f05aac21c32c638e939e447/pip-9.0.1.tar.gz#md5=35f01da33009719497f01a4ba69d63c9
Best match: pip 9.0.1
Note that in this example, the upgrade was to 9.0.1. Use vim to open the /usr/bin/pip file and change the instances of 7.1.0 to 9.0.1, and this solves the pip error and will allow you to install the dependencies.
1
sudo vim /usr/bin/pip
Once you’ve fixed the config file re-run the sudo pip install graphviz... command from above.
Setup CUDA
This image doesn’t come with cuDNN, however Caffe2 requires it. Here we’re downloading the files, extracting them, and copying them into existing folders where CUDA is currently installed.
Note: recent developments indicate that you should try to upgrade to CUDA 8 and cuDNN 6, however these instructions provide a working build with v7.5 and cuDNN 5.1.
1
2
3
4
5
wget http://developer.download.nvidia.com/compute/redist/cudnn/v5.1/cudnn-7.5-linux-x64-v5.1.tgz
tar xfvz cudnn-7.5-linux-x64-v5.1.tgz
sudo rsync -av cuda /opt/nvidia/
rm cudnn-7.5-linux-x64-v5.1.tgz
rm -rf cuda
Now you need to setup some environment variables for the build step.
1
2
export CUDA_HOME=/opt/nvidia/cuda
export LD_LIBRARY_PATH=/opt/nvidia/cuda/lib64:/usr/local/bin
Almost done. Now you need to clone Caffe2 repo and build it (note: update the -j8 with your system’s number of processors; to check this, run nproc from the terminal.):
1
2
3
git clone https://github.com/pytorch/pytorch.git && cd pytorch
git submodule update --init --recursive
python setup.py install
Test it out!
To check if Caffe2 is working and it’s using the GPU’s try the commands below. The first will tell you success or failure, and the second should trigger the GPU and output of a bunch of arrays, but more importantly, you should see no error messages! Consult the Troubleshooting section of the docs here and for Ubuntu for some help.
1
2
python -c 'from caffe2.python import core' 2>/dev/null && echo "Success" || echo "Failure"
python -m caffe2.python.operator_test.relu_op_test
Test CUDA
Here are a series of commands and sample outputs that you can try. These will verify that the GPU’s are accessible.
1
2
3
4
5
6
7
8
9
10
11
12
13
14
15
16
17
18
19
20
21
$ cat /proc/driver/nvidia/version
NVRM version: NVIDIA UNIX x86_64 Kernel Module 352.99 Mon Jul 4 23:52:14 PDT 2016
GCC version: gcc version 4.8.3 20140911 (Red Hat 4.8.3-9) (GCC)

$ nvcc -V
nvcc: NVIDIA (R) Cuda compiler driver
Copyright (c) 2005-2015 NVIDIA Corporation
Built on Tue_Aug_11_14:27:32_CDT_2015
Cuda compilation tools, release 7.5, V7.5.17

$ nvidia-smi -q | head

==============NVSMI LOG==============

Timestamp : Fri Mar 10 23:15:45 2017
Driver Version : 352.99

Attached GPUs : 1
GPU 0000:00:03.0
Product Name : GRID K520
Product Brand : Grid
That’s it. You’ve successfully built Caffe2!
Setting Up Tutorials & Jupyter Server
If you’re running this all on a cloud computer, you probably won’t have a UI or way to view the IPython notebooks by default. Typically, you would launch them locally with ipython notebook and you would see a localhost:8888 webpage pop up with the directory of notebooks running. The following example will show you how to launch the Jupyter server and connect to remotely via an SSH tunnel.
First configure your cloud server to accept port 8889, or whatever you want, but change the port in the following commands. On AWS you accomplish this by adding a rule to your server’s security group allowing a TCP inbound on port 8889. Otherwise you would adjust iptables for this.
Next you launch the Juypter server.
1
jupyter notebook --no-browser --port=8889
Then create the SSH tunnel. This will pass the cloud server’s Jupyter instance to your localhost 8888 port for you to use locally. The example below is templated after how you would connect AWS, where your-public-cert.pem is your own public certificate and [email protected] is your login to your cloud server. You can easily grab this on AWS by going to Instances > Connect and copy the part after ssh and swap that out in the command below.
1
ssh -N -f -L localhost:8888:localhost:8889 -i "your-public-cert.pem" [email protected]
Troubleshooting
caffe2.python not found | You may have some PATH or PYTHONPATH issues. Add /home/ec2-user/caffe2/build to your path and that can take care of those problems.
error while loading shared libraries: libCaffe2_CPU.so: cannot open shared object file: No such file or directory | Try updating your LD_LIBRARY_PATH with export LD_LIBRARY_PATH=/usr/local/lib:$LD_LIBRARY_PATH
undefined reference to `ncclReduceScatter’ | This does not occur on Caffe2 building, but on linking with “libCaffe2_GPU.so” in some external projects. To solve this, you may install NCCL from its source bundled with Caffe2: (under the Caffe2 project directory) cd third_party/nccl && make -j 8 && sudo make install
Windows 10 or greater is required to run Caffe2.
Prebuilt
There are no pre-built binaries available for Windows yet. Please install from source.
Windows build is in testing and beta mode. For the easiest route, use the docker images for now in CPU-only mode.
Required Dependencies
The first thing you want to do is to assess whether or not you’re going to use GPU acceleration with Caffe2. If you have an NVIDIA GPU and you plan on training some neural networks, then it’s probably worth the extra installation an effort. If you’re just going to play around with pre-trained models then skip the video drivers and NVIDIA CUDA/cuDNN installation steps.
- Update your video drivers: assuming you have an NVIDIA card, use NVIDIA GeForce Experience to run the latest update.
- NVIDIA CUDA/cuDNN: if you have GPU(s) then go ahead and install
- Python 2.7.6 to Python 2.7.14. Python 3 support is experimental. You can use regular Python or Anaconda Python. Just note that you might have issues with package location and versioning with Anaconda. Some Anaconda notes are provided below the Regular Python notes. Take care to install the 64 bits version of Python, since we will be going to compile for 64 bits.
- Install a C++ compiler such as Visual Studio Community Edition 2017
- When installing VS 2017, install Desktop Development with C++ (on the right select: C++/CLI support) and v140 (on the right select: VC++ 2015.3 v140 toolset)
- Install Cmake
Setup Python, Install Python Packages, Build
Regular Python Install
Install Python 2.7.14 (x86-64) and Microsoft Visual C++ Compiler for Python 2.7.
Assuming you have already added C:\Python27 and C:\Python27\scripts to your Path environment variable, you can go ahead and use pip to install the Python dependencies.
1
2
3
4
5
pip install future ^
            hypothesis ^
            numpy ^
            protobuf ^
            six
While these are optional, they’re recommended if you want to run the tutorials and utilize much of the provided materials.
1
2
3
4
5
6
7
8
9
10
11
12
pip install flask ^
            glog ^
            graphviz ^
            jupyter ^
            matplotlib ^
            pydot python-nvd3 ^
            pyyaml ^
            requests ^
            scikit-image ^
            scipy ^
            setuptools ^
            tornado
** Unresolved Issues with Optional Packages **
- gflags: need to build from source
- glog: need to build from source
- leveldb: need to build from source
leveldb build notes:
- Download Boost and build it, specifying static libraries (the default is shared) and 64 bit if necessary (32 bit is default)
- Get the qdb branch of leveldb: https://github.com/bureau14/leveldb
- Build leveldb, ensuring Runtime Library is set to ‘Multi-Threaded (/MT)’ in properties,C/C++ for both the leveldb and leveldbutil projects
- Download the Windows port of Snappy for C++
Clone & Build
Open up a Developer Command Prompt, find an appropriate place to clone the repo, and use this command. Or if you have GitHub Desktop, you can use that instead. If you’ve already forked Caffe2 or have it locally and you’re using Visual Studio, skip ahead to the next step.
1
git clone --recursive https://github.com/pytorch/pytorch.git
If you want to build Python bindings, you need to edit ‘\scripts\build_windows.bat’ and set BUILD_PYTHON to ON
Then run the Developer Command Prompt for VS 2017, browse to the repo’s \scripts folder and execute:
1
build_windows.bat
For VS15 and VS17 users with GitHub Desktop:
- Install the GitHub Extension for Visual Studio.
- From within Visual Studio you can open/clone the GitHub repository. From the Getting Started page under Open, you should have GitHub as an option. Login, and then either choose Caffe2 from the list (if you’ve forked it) or browse to where you cloned it. Default location hereinafter is referencing
C:\Users\username\Source\Repos\caffe2.
Python Configuration
You will find the Caffe2 binary in $USER\Source\Repos (if that’s where you put the caffe2 source) \pytorch\build\caffe2\python
Copy caffe2_pybind11_state.pyd to Python’s DLL folder $USER\AppData\Local\Continuum\Anaconda2\DLLs. If you’re not using Anaconda, then put it in your Python27 or python-2713 folder.
Now you can run python from \pytorch\build directory and successfully import caffe2 and other modules.
Anaconda Python
** this install path needs correction / confirmation **
- Anaconda: download the Python 2.7 version.
- Run
Anaconda Promptas Administrator. Go to the search bar, search for “anaconda prompt” and right-click it and choose “Run as Administrator”. - Install Python packages:
1
conda install -y --channel https://conda.anaconda.org/conda-forge  graphviz hypothesis numpy pydot-ng python-lmdb requests zeromq
Things that are options that get installed already by other prerequisites
- flask (already installed)
- matplotlib (probably can skip as it comes with numpy)
- pyyaml (already installed)
- scikit-image (probably can skip - comes with numpy)
- scipy (probably can skip - comes with numpy)
- setuptools (already installed)
- tornado (already installed)
Not found for Windows with conda - not the end of the world, but if you want these you’ll probably have to build them from source.
- automake
- open-mpi
- python-nvd3
- rocksdb
Troubleshooting
| Build errors | |
|---|---|
| C++ compiler not found | For VS 2017 users, update the windows install batch file for the -G switch found in (caffe2/scripts/build_windows.bat). |
| Solution | Note the cmake section and update it to reflect your VS version: cmake -G “Visual Studio 15 2017 Win64” |
| Python errors | |
|---|---|
| ‘python’ is not recognized… | You need to setup Python in your PATH environment variable. |
| Solution | Depending on you version of Windows, you go about this differently. Generally this is Control Panel > System & Security > System > Advanced system settings > Environment Variables, edit the PATH variable and add a new entry for C:\Python27 or whatever you installation directory was for Python. You’re looking for wherever python.exe resides. |
| GPU Support | |
|---|---|
| GPU drivers | The easiest route is to go to NVIDIA’s site and download and install their binary for Windows. |
| Solution | Caffe2’s GPU support is Nvidia CUDA 6.5 or greater. CUDA 8.0 is recommended. Install from NVIDIA’s site; free developer account required. NVIDIA Windows Installation guide |
| Installing CUDA 8.0: “No supported version of Visual Studio was found. Must use VS 15.” | Until NVIDIA updates CUDA to support VS 17, you’re going to have to install VS 15 and try again. |
Dependencies
- If you have Windows 10 Professional, then install Docker Community Edition for Windows
- If you have a Windows 10 Home, then you need Docker Toolbox
Note: GPU mode is not currently supported with Docker on Windows with the possible exception of Windows Server 2016
Install Caffe2 for your development platform
If you want to build Caffe2 for use on iOS, first follow the instructions to setup Caffe2 on your Mac platform using the toggler above, and then:
Note Caffe2 for iOS can only be built on a Mac
Xcode
If you have not installed Xcode (because you used a prebuilt Caffe2 binary, etc.), install it first.
Dependencies
Install Automake and Libtool. This can be done on a Mac via brew install automake libtool.
Download Caffe2 Source
If you have not done so already, download the Caffe2 source code from GitHub
1
2
git clone --recursive https://github.com/pytorch/pytorch.git
git submodule update --init
Run the Build Script
1
2
cd caffe2
./scripts/build_ios.sh
There are no pre-built binaries available for iOS yet. Please install from source.
Install Caffe2 for your development platform
If you want to build Caffe2 for use on Android, first follow the instructions to setup Caffe2 on your given development platform using the toggler above, and then:
Android Studio
Android Studio will install all the necessary NDK, etc. components to build Caffe2 for Android use.
Dependencies
Install Automake and Libtool. This can be done on a Mac via brew install automake libtool or on Ubuntu via sudo apt-get install automake libtool.
Download Caffe2 Source
If you have not done so already, download the Caffe2 source code from GitHub
1
2
git clone --recursive https://github.com/pytorch/pytorch.git
git submodule update --init
Run the Build Script
If you want to build Caffe2 for Android with armeabi-v7a ABI:
1
2
cd pytorch
./scripts/build_android.sh
Or if you want to build Caffe2 for Android with arm64-v8a ABI:
1
2
cd pytorch
./scripts/build_android.sh -DANDROID_ABI=arm64-v8a -DANDROID_TOOLCHAIN=clang
There are no pre-built binaries available for Android yet. Please install from source.
Docker Images
Docker images are currently in testing. If you would like to build an image yourself, follow the instructions further below. For a quick install try the following commands (assuming you have Docker installed already).
USB/offline or Quickstart instructions
Get caffe2ai/caffe2
Visit our Docker repo for a full list of different Docker options. Currently we have CPU and GPU support for both 14.04 and 16.04 Ubuntu.
If you wish to use GPU with Docker use nvidia-docker to run your image instead of regular docker.
You can get nvidia-docker here.
For the latest Docker image using GPU support and optional dependencies like IPython & OpenCV:
1
2
3
4
5
docker pull caffe2ai/caffe2
# to test
nvidia-docker run -it caffe2ai/caffe2:latest python -m caffe2.python.operator_test.relu_op_test
# to interact
nvidia-docker run -it caffe2ai/caffe2:latest /bin/bash
For a minimal image:
1
2
3
4
5
docker pull caffe2ai/caffe2:cpu-minimal-ubuntu14.04
# to test
docker run -it caffe2ai/caffe2:cpu-minimal-ubuntu14.04 python -m caffe2.python.operator_test.relu_op_test
# to interact
docker run -it caffe2ai/caffe2:cpu-minimal-ubuntu14.04 /bin/bash
See below for instructions on usage.
Build From Dockerfile
Inside repo’s /docker folder are subfolders with a Dockerfile that contain the minimal dependencies and optional ones. You may remove specific optional dependencies if you wish. The folder’s name describes the defaults that will be installed by that dockerfile. For example, if you run the command below from the ubuntu-14.04-cpu-all-options folder you will get a docker image around 1.5GB that has many optional libraries like OpenCV, for the minimal install, ubuntu-14.04-cpu-minimal, it is about 1GB and is just enough to run Caffe2, and finally for the gpu dockerfile, ubuntu-14.04-gpu-all-options, it is based on the NVIDIA CUDA docker image about 3.2GB and contains all of the optional dependencies.
In a terminal window in one of those folders, simply run the following:
1
2
cd ~/caffe2/docker/ubuntu-14.04-cpu-all-options
docker build -t caffe2:cpu-optionals .
Don’t miss the . as it is pointing to the Dockerfile in your current directory. Also, you can name docker image whatever you want. The -t denotes tag followed by the repository name you want it called, in this case cpu-optionals.
Once the build process is complete you can run it by its name or by the last unique ID that was provided upon completion. In this example case, this ID is 5ee1fb669aef. To run the image in a container and get to bash you can launch it interactively using the following where you call it by its repository name:
1
docker run -it caffe2 /bin/bash
If you decide to try out the different Docker versions of Caffe2 using different dependencies then you will want to build them with their own tag and launch them using their tag or unique ID instead, for example using an ID from the previous step:
1
docker run -it 5ee1fb669aef /bin/bash
Or, building with a tag and then launching with the tag:
1
2
docker build -t caffe2:cpu-minimal .
docker run -it caffe2:cpu-minimal /bin/bash
Using A Caffe2 Docker Image
You can run specific Caffe2 commands by logging into bash as shown above, hitting the Python interface directly, or by interacting with IPython as shown below.
The simplest test was already run during the build, but you can run it again.
Be warned that these tests only work with the optional dependencies images.
1
docker run -it mydocker-repo/mytag ipython
For GPU support, use nvidia-docker. There’s also this alternative, manual approach were you will need to pass in several device parameters. Be warned that Windows support for this is limited.
1
sudo docker run -ti --device /dev/nvidia0:/dev/nvidia0 --device /dev/nvidiactl:/dev/nvidiactl --device /dev/nvidia-uvm:/dev/nvidia-uvm mydocker-repo/mytag ipython
Then once in the IPython environment you can interact with Caffe2.
1
In [1]: from caffe2.python import workspace
If you want to get in the image and play around with Python or C++ directly, just launch bash like so:
1
docker run -it mydocker-repo/mytag /bin/bash
Another test that you can use to put Caffe2 through its paces, including GPU support, is by calling one of the operator tests. Here’s a sample output.
1
nvidia-docker run -it caffe2 python -m caffe2.python.operator_test.relu_op_test
You may also try fetching some models directly and running them as described in this Tutorial.
Jupyter from Docker
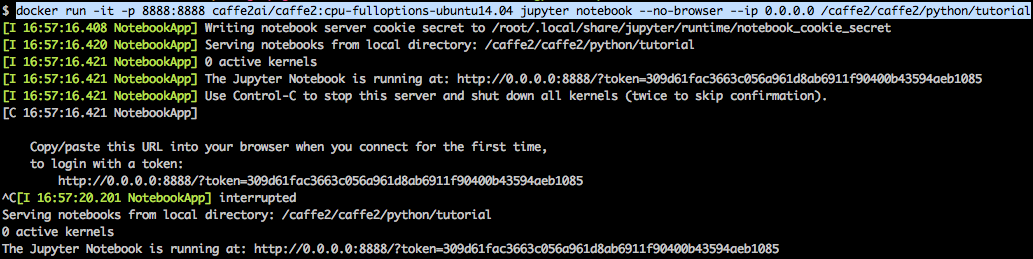
If you want to run your Jupyter server from a Docker container, then you’ll need to run the container with several additional flags. The first new one (versus running it locally) for Docker is -p 8888:8888 which “publishes” the 8888 port on the container and maps it to your host’s 8888 port. You also need to launch jupyter with --ip 0.0.0.0 so that you can hit that port from your host’s browser, otherwise it will only be available from within the container which isn’t very helpful. Of course you’ll want to swap out the caffe2ai/caffe2:cpu-fulloptions-ubuntu14.04 with your own repo:tag for the image you want to launch.
In this case we’re running jupyter with
sh -c. This solves a problem with the Python kernel crashing constantly when you’re running notebooks.
1
docker run -it -p 8888:8888 caffe2ai/caffe2:cpu-fulloptions-ubuntu14.04 sh -c "jupyter notebook --no-browser --ip 0.0.0.0 /caffe2_tutorials"
Your output will be along these lines below. You just need to copy the provided URL/token combo into your browser and you should see the folder with tutorials. Note the if you installed caffe2 in a different spot, then update the optional path that is in the command /caffe2_tutorials to match where the tutorials are located.
In some situations you can’t access the Jupyter server on your browser via 0.0.0.0 or localhost. You need to pull the Docker IP address (run
docker-machine ip) and use that to access the Jupyter server.
Docker - Ubuntu 14.04 with full dependencies notes:
- librocksdb-dev not found. (May have to install this yourself if you want it.)
| Troubleshooting | |
|---|---|
| common_gpu.cc:42 | Found an unknown error - this may be due to an incorrectly set up environment, e.g. changing env variable CUDA_VISIBLE_DEVICES after program start. I will set the available devices to be zero. |
| Solution | This may be a Docker-specific error where you need to launch the images while passing in GPU device flags: sudo docker run -ti --device /dev/nvidia0:/dev/nvidia0 --device /dev/nvidiactl:/dev/nvidiactl --device /dev/nvidia-uvm:/dev/nvidia-uvm mydocker-repo/mytag /bin/bash. You will need to update those devices according to your hardware (however this should match a 1-GPU build) and you need to swap out mydocker-repo/mytag with the ID or the repo/tag of your Docker image. |
| HyperV is not available on Home editions. Please use Docker Toolbox. | Docker for Windows only works on Professional versions of Windows. |
| Solution | Install Docker Toolbox. Don’t worry, the Caffe2 images should still work for you! |
| An error occurred trying to connect… | various errors just after installing Docker Toolbox… |
| Solution | run docker-machine env default then follow the instructions… run each of the commands that setup the docker environment then try docker version and you shouldn’t see the errors again and will be able to docker pull caffe2ai/caffe2. |
For Raspbian, clone the Caffe2 source, run scripts/build_raspbian.sh on the Raspberry Pi.
Download Caffe2 Source
If you have not done so already, download the Caffe2 source code from GitHub
1
2
git clone --recursive https://github.com/pytorch/pytorch.git
git submodule update --init
Run the Build Script
For Raspbian, run scripts/build_raspbian.sh on the Raspberry Pi.
1
2
cd caffe2
./scripts/build_raspbian.sh
There are no pre-built binaries available for Raspbian yet. Please install from source.
There are no Docker images for Raspbian available at this time. Please install from source.
To install Caffe2 on NVidia’s Tegra X1 platform, simply install the latest system with the NVidia JetPack installer, clone the Caffe2 source, and then run scripts/build_tegra_x1.sh on the Tegra device.
Install JetPack
Download Caffe2 Source
If you have not done so already, download the Caffe2 source code from GitHub.
1
2
git clone --recursive https://github.com/pytorch/pytorch.git
git submodule update --init
Run the Build Script
Run scripts/build_tegra_x1.sh on the Tegra device.
1
2
cd caffe2
./scripts/build_tegra_x1.sh
There are no pre-built binaries available for Tegra yet. Please install from source.
There are no Docker images available for Tegra. Please install from source.